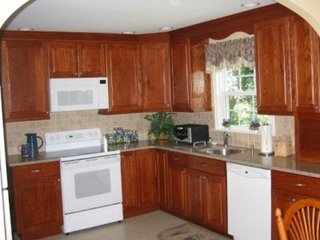
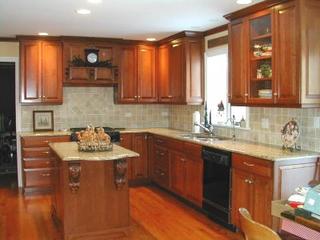
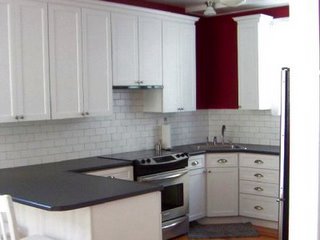
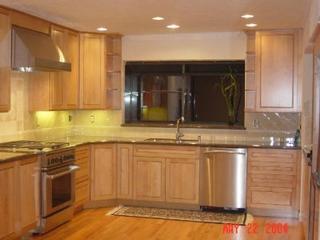
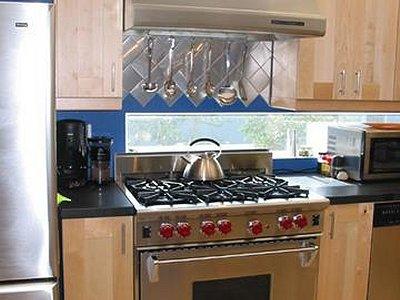
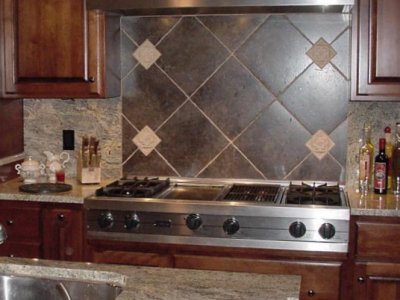
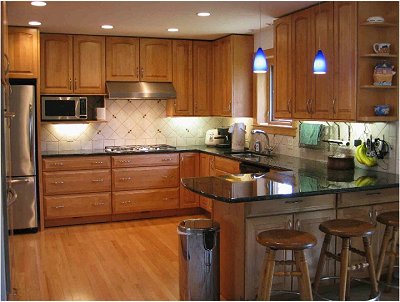
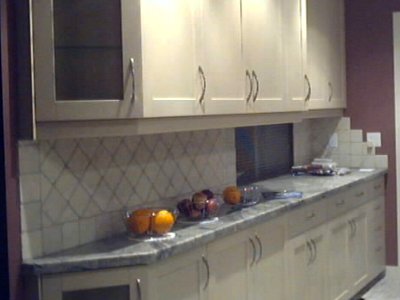
shanbr's Kitchen
Engineered stone/quartz/ Avanza counters/white thermofoil facelift

Posted by:
shanbr (
My Page) on Fri, Sep 12, 03 at 15:14
Wasn't going to post this but there aren't many pics of engineered stone yet so
thought it might be helpful. I didn't have any decent before pics.
Improvements include small updates to a 6 year 'builder's' kitchen with ample size
and agreeable floorplan. Appliances remain (Cook, no. Eat, yes)
- Removed GIANT fluorescent box fixture from ceiling. Left a 50 sq ft hole in ceiling. (DIY)
- Installed recessed lighting (Lowe's remodel kits) throughout kitchen and UC lighting
(GE slim fluor. lights) (DIY) Repaired/repainted ceiling.
- Installed new pendants over table/island (home depot)
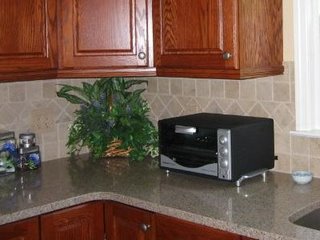
- Replaced really bad laminate countertops with AVANZA engineered stone (Color is
ABRUZZO). DIY on demolition of old counters. Professional install of new.
- Replaced cabinet knobs with metallic copper color knobs(Great Indoors). Cabinets
are existing white thermofoil in excellent shape.
- Recolored 300+ sq feet of dirty 'white' floor grout. Grout colorant from
www.thisoldgrout.com - chaparral (caramel brown) is the color.
I can offer advice on DIY recessed light installation, flurorescent box removal,
laminate counter removal (thanks remodeling forum), and grout coloring. Also, can
relate experience with Avanza purchase.
Shannon
Here is a link that might be useful: My kitchen
editor's note: Shannon's link showed only html text, so I copy and pasted the html here:
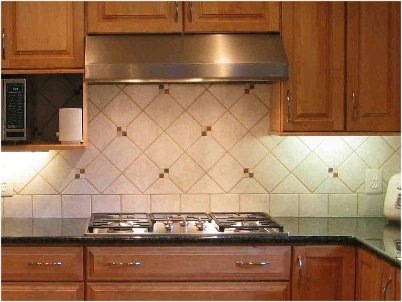
This is the big hole that was left after the large fluorescent
fixtures were removed. There was a large frame built around them that
was covered in crown molding. By the time we cut back some of the sheetrock for
attaching new drywall, we had about a 10 ft x 5 ft hole.

Other pictures are "after pictures" from our kitchen facelift.
During June/July 2003 we:
Changed the countertops from faux marble laminate to AVANZA engineered quartz - color is ABRUZZO
Removed the large bright fluorescent fixture out of the middle of the kitchen.
Replaced drywall, retextured/repainted ceiling. Hung double pendant over island that
matches pendant over breakfast table.
Added recessed lights throughout kitchen/breakfast area.
Added under cabinet fluorescent lights.
Recolored 300+ sq feet of floor grout with grout stain from thisoldgrout.com -- color is CHAPPARAL -
caramel like brown.
Changed knobs on cabinets and drawers (47 knobs) to a coppery metallic colored knob.
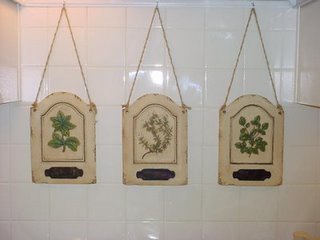
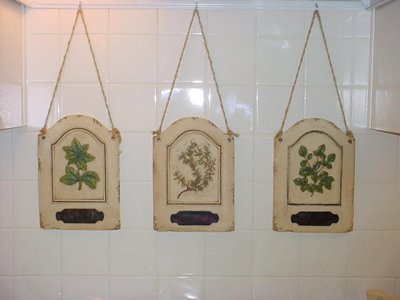
Updated backsplash over stove with plaques.
The following projects were do it yourself:
Removing old fixture.
Installing recessed fixtures and island/table fixtures.
Replacing sheetrock on ceiling.
Demolition of old countertops.
Re-coloring of floor grout.
We hired painter to refloat/retexture/repaint the ceiling.
The countertops were professionally installed as that is not a DIY job.
http://home.houston.rr.com/shan262/kitchenpic5.jpg
http://home.houston.rr.com/shan262/kitchenpic6.jpg
http://home.houston.rr.com/shan262/kitchenpic3.jpg
http://home.houston.rr.com/shan262/kitchenpic4.jpg
http://home.houston.rr.com/shan262/kitchenpic7.jpg
http://home.houston.rr.com/shan262/kitchenpic1.jpg
http://home.houston.rr.com/shan262/kitchenpic10.jpg
http://home.houston.rr.com/shan262/kitchenpic8.jpg
http://home.houston.rr.com/shan262/kitchenpic2.jpg
http://home.houston.rr.com/shan262/kitchenpic9.jpg
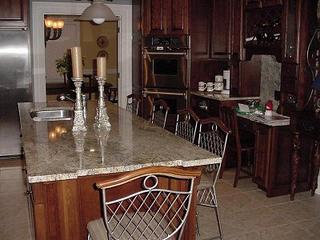
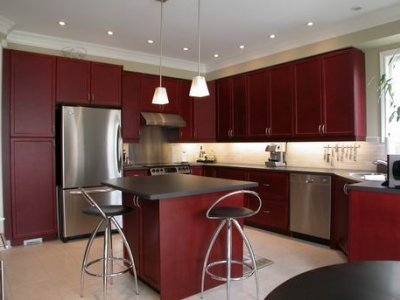
moogies' Kitchen
RE: Finished Kitchens - Pic Links Only, no responses please


We moved in July 1st, with the house unfinished, and are finally wrapping up our punch list - in November! Anyway - here's the kitchen highlights:
Kohler Interlace Apron Sink
Jacuzzi Saletto (secondary) sink
Tapmaster
Price Pfister Marielle Faucets
Labrador Antique Granite
Copper Quartzite backsplace - 4" and harlequin tiles
Custom cabs with grapevine carving - chestnut finish
Jennaire gas cooktop with gas grille
Whirlpool Gold Double Ovens/Convection
Whirlpool Gold microwave
Kitchenaid Dishwasher & compactor
Kitchenaid Superba built-in refrigerator
Pegasus Xenon undercabinet lighting
Pegasus Xenon puck display cabinet lighting
Flooring is wood-look ceramic tile - herringbone pattern with perimeter border (sorry, I don't know the mfg) |
Here is a link that might be useful:
Moogie's Kitchen
lasocal's Kitchen
RE: Finished Kitchens - Pic Links Only, no responses please


I finally took some "all done" photos of our kitchen and posted them online.
The details:
IKEA cabinets (Adel birch)
Honed absolute black granite counters
Bamboo floors (natural, vertical)
Wolf range (36 inch, 6 burners)
Elkay SS undermount double bowl sink
Grohe Ladylux Cafe Spray faucet
and cheapo IKEA stools that we will replace someday!
We bought the Kenmore SS fridge (pullout freezer on bottom) and
Whirlpool Gold SS dishwasher right after we moved in, before we started renovating
(and before I discovered this forum, otherwise we probably would have made some
different selections!)
We've used and abused the kitchen for almost 5 months now and love it (no horror
stories involving the honed granite. this stuff is great). |
Here is a link that might be useful: Jen's colorful contemporary kitchen
editor's note: this is Jen's updated link:
http://pg.photos.yahoo.com/ph/lasocal70/my_photos
ginmtb's Kitchen
ginmtb's Kitchen


Contact:
ginmtb (
My Page)
Posted on Wed, Jan 14, 04
Link to kitchen photos:
http://pages.sbcglobal.net/ginmtb/kitchen.htmDetails:- Cabinets: Kraftmaid, shaker doors, bisque glazeCooktop - Dacor Epicure 36" residential/commercial 90,000 BTU's baby!
- Countertop: Golden Oak granite
- Backsplash: 4"x8" subway tiles (tumbled marble) around the entire area. The area behind the cooktop will be partially subway tile, but will also include a framed in section with raised edge - and 4"x4" tumbled marble tiles on a diagonal in the framed section. Also three little decorative pieces that will attach to the diagonal tiles. The tile is hand made right in No. Cal - in Sonoma.
- Hood - Dacor Epicure 42" matching stainless steel - 1200cfm (Mark, crank it up to high when the beer and Taco Bell is present - we should be okay)
- Refrigerator - KitchenAid counter depth stainless side-by-side 25 cubic feet w/water and ice dispenser
- Oven - KitchenAid convection single oven
- Microwave - cute little KitchenAid standalone unit with trim kit
- Trash Compactor - KitchenAid with the cool hidden controls
- Garbage Disposal - ISE 777 1HP with ISE SinkTop Switch (air switch - pretty trick setup) - got the disposal on eBay.
- Delta 470SS faucet (got it on eBay)
- Blanco freakin' MONGO stainless steel double undermount sink (38" wide, 10" deep) - got it on eBay too!
- WFI Santos Mahogany engineered, pre-finished hardwood flooring. 5" planks
- GE Undercabinet Lights
- Top Knobs pulls and knobs - Normandy VI collection
teddi_and_roger's Kitchen
Teddi_and_Roger's Kitchen


Contact:
Teddi_and_Roger (
My Page)
Posted on Tue, Nov 11, 03
Link to kitchen photos:
http://www.pbase.com/teddi_and_roger
Details:
- Range - Viking VGIC305-4BWH
- Dishwasher - Bosch SHU43C02
- Fridge - Whirlpool Gold
- Sink - Blanco Supreme 510-887; 10/8"bowls
- Faucet - Delta 174SSWF
- Cabinets - Local custom Cabinet Maker(Cherry, frameless)
- Hardware - Colonial Brass cup pulls & Ikea handles
- Flooring - Wilsonart Estate Plus Tiles; Taupe Fossil
- Vent Hood - Vent-a-hood Pro Series 18" Wall Mount etc…
- Countertops, Full Backsplash, & Table Top - Verde Marinace
- Instant Hot Water - In-Sink-Erator GN 1100 in satin nickel
- Garbage Disposal - In-Sink-Erator 777SS
- Lighting - Undercounter GE fluorescents
- Table base/chairs - Lyndon Furniture (Natural cherry)
- Built in Dining Bench - Cabinet maker
- Windows/Patio Door - Sierra Pacific
- Barstools - Holland Bar Stools
Other than cabinets and counters this was a complete DIY project. Kudos to DH!
nicole__'s Kitchen
Red Oak Shaker Kitchen with Juperana Royalton Granite


Contact:
Nicole__ (
My Page)
Posted on Sun, Nov 9, 03
Link to original kitchen photos:
http://community.webshots.com/album/80194277xfzlYz
Link to additional kitchen photos:
Details:
- Cabinets: Custom red oak, Shaker style cabinets.
Built-in wine rack, built-in knife rack, planning desk, pull-out trash bins, slotted cookie-sheet holders, 15' long island, toe-kick vents to heat floor
- Countertops: 3cm Juperana Royalton granite
- Backsplash: 2cm Juperana Royalton granite
- Appliances:
- SS KA DW,double convec. ovens,sxs ctr depth frig.
- Commercial Wolf 6 burner cooktop
- Plumbing:
- Franke PSX-110-9 sink w grid
- Grohe Ladylux Cafe faucet
- Boberick soap dispenser
- Hardware: ss handles from leevalley.com
- Floor: ceramic floor tile by Daltile, Bali Beige, purchased from HD (my only real bargain,.79 cents ea 12" X 12" tile)
oshnwavz' Kitchen
oshnwavz' Kitchen
Contact:
oshnwavz (
My Page)
Posted on Thu, Oct 23, 03
Link to kitchen photos:
http://community.webshots.com/album/401069138 Details:
- Oak Kraftmaid cabinets in Autumn Blush finish
- Amerock Inspiration Knobs and Pulls in Weathered Nickel (http://www.myknobs.com/incol.html)
- Silestone countertop in Blue Sahara (http://www.silestoneusa.com)
- Backsplash 3 1/2 inch square porcelain tile. Pietra by ILVA - color is cardiel. (http://www.ilva.com.ar/products/patagonica)
- Armstrong sheet vinyl floor - 84194 Nickel Mines / Limestone
- Elkay sink - ELU2118 without reveal
- Grohe Alira faucet and matching soap dispenser from http://www.faucetconnection.com 1-800-349-4024
- Insinkerator 444 garbage disposal
- Garbage Disposal air switch from Disposertrol 1-800-431-2625 (color is stainless, but its shiny)
- GE Microwave JVM1860
- GE Stove JDP78
- Maytag DW MDB7600
- Color of walls is 4W17-2 (Maple Cream)
- Two new replacement windows with grills in between the glass
- New sliding glass door (with plans to add a deck next year)
- New steel entry door into garage.
- Lots of new insulation.
- Ceilings replaced.
- Recessed lighting
- Halogen under cabinet lights
If you want to see how truly ugly the BEFORE was, be sure to checkout my KITCHEN BEFORE TOUR album and check out the 2 layers of carpet on the floor which served as the bottom shelf of the cabinets. After seeing that, a few of you had suggested that I add myself to the list of "ugliest before kitchens". As you shall see, there has been quite a transformation!
rima_wa's Kitchen
Rima_WA's Kitchen

Posted by:
Rima_WA (
My Page) on Thu, Oct 2, 03 at 19:09
Great idea, Weed. Adding my kitchen pix in. Will cut & paste the text from my original
post:
Finally, I am posting photos of my kitchen remodel. It is pretty much done except for
knobs, putting the baseboards back on, backsplash, and touching up the paint that
was scuffed when the cabinets went in. The doors for the cabinet over the frig came
in in the wrong size, so we are still waiting for those. Also, we plan to get new windows
sometime in the future, but not anytime soon.
We started planning for this remodel in August of 2002, started demolition Memorial
Day weekend of 2003. The contractors came mid June and left around August 1.
Since then it has been a flurry of houseguests and vacation, and generally not thinking
about the kitchen for a little while.
Work DH did:
All demolition (except floor removal – we had a contractor do that)
New subfloor
Painting
Installed cork floor
We also took care of getting our own granite, floor and appliances.
We estimate that the stuff we did on our own saved us more than 10K. We were lucky
to have contractors who had no problem with splitting the responsibilities.
Info about what we got:
Floor – Duro cork in "Edipo" (we designed our own pattern)
Counters – Arctic Rainbow granite (Pental/Priceless Granite)
Cabinets – Neff "Mainau Tree" finish (Seattle Kitchen Designs)
DW – Miele
Sink – Kindred Big Single Bowl
Faucet – Grohe
Disposal - Hydromaid
Cooktop – Wolf
Ovens - Wolf
Hood – Miele
Table & Chairs – Ikea
Pendant Lights – Tek lighting
Rug - Ikea
I mention Priceless Granite and Seattle Kitchen Designs because they did a fabulous job – Priceless was so accommodating and the install is beautiful – they really gave some thought to where the seams should go and making the most of the slabs we bought. SKD also GCed our project and they were great to work with too – coordinated plumbing, electrical, cabinet and appliance install.
Knobs – I am still in “knob hell” and can’t decide what to get, thus the blue painter’s tape on the cabinets
Backsplash – will be a blue opalescent glass tile, applied only behind the cooktop. It picks up the various blue shades in the granite perfectly. I plan to put it in next year sometime, doing it myself. Picture of it with the granite in the link.
Still looking for little extras like new dish drainer, canisters and stuff like that.
Thank you everyone for your help and input on this – so much of what we ended up with I learned about on this forum! You all made it so much easier and better.
Here is a link that might be useful:
Rima & Andy's Kitchen
http://rima_wa.home.comcast.net/kitchen/photos/
ktdid16's Kitchen
Galley Kitchen/Traditional Contemporary

Posted by:
ktdid16 (
My Page) on Mon, Sep 22, 03 at 1:22
We tore out our circa 1962 kitchen out last summer and redid everything from the
walls out. Work was done by a kitchen and bath contractor: demo to functional
appliances 6 weeks, everything but backsplash and finishing details at 9 weeks,
completely finished at around 16 weeks. I cook a lot and have lots of cooking related
stuff,as well as several hundred cookbooks. One goal of the remodel was to optimize
the space in the kitchen, hence lots of specialized cabinet features.
Cabinets: custom, local cabinetmaker. 30" deep rather than standard 24". Cherry,
natural finish. Full extension drawers and pull outs for all interior shelves.
Counter and window sills: Giallo Santa Cecilia granite, with lots of beautiful garnets
Kindred undermount SS sink, Grohe LadyLux Cafe faucet and soap dispenser, ISE hot
water dispenser
Backsplash: Sonoma Tilemakers, vanilla glaze
Wolf 5 burner cooktop
Venmar hood
Wolf 30" double ovens
Miele G892SC dishwasher
Kept relatively new Amana frig, but had it professionally painted (it used to be white). Left space in cabinets for a side by side when it needs replacing.
Tarkett vinyl flooring: Arizona Sand
The kitchen has been in about a year now and we love it! All the planning and agonizing over choices really paid off.
Here is a link that might be useful: Katie's Kitchen
zanthe's Kitchen
zanthe's Kitchen

Contact:
zanthe (
My Page)
Posted on Sat, Sep 13, 03
Link to kitchen photos:
Sorry, we do not have a link to zanthe's photos
Our kitchen is traditional with cherry cabinets, black countertops, white appliances
(small children, no finger prints!) and porcelain tile. What I love:
~Trash compactor (never had one before).
~Tilt out sink tray.
~Soap dispenser.
~Air switch for the garbage disposal (under the sink).
~Full extension drawers.
~9" "cookie sheet" cabinet by the range.
~Blackstar Granite countertops by Wilsonart. The color and texture is wonderful and it's very easy to keep looking nice (finger prints etc.). What I would have done differently:
~Purchased a range that didn't have a glass top. My pans slide around too much.
~Raised the microwave or moved it. It seems a bit close to the range.
~The 21" trash bin cabinet would pull out with the door rather than having to open
the door and then pull the bins out on a glider. The gliding system hits the door and
leaves marks (added felt recently and this has helped). ~Holiday Kitchens, Cherry, Autumn finish, 42" uppers
~Shaw 12"x12" porcelain tile, "Coastal Ivory"
~Wilsonart Blackstar Granite laminate countertops on the perimeter, touchstone
finish, #50, 12" overhang in the breakfast nook for bar stools, bull-nose edge
~Black Galaxy granite on the island, full bull-nose edge
~GE Advantium 120 microwave, GE Profile slide-in oven
~Kohler SS "Staccato" sink
~Belle Foret "High-Spout" faucet purchased at www.faucet.com
~Murray Feiss light (breakfast nook)
~Sea Gull Lighting "Ambiance Components" (under cabinet)
~Sherwin Williams "Nomadic Desert" paint |
kristen82's Kitchen
kristen82's Kitchen
Contact:
kristen82 (
My Page)
Posted on Mon, Sep 8, 03
Link to kitchen photos:
Sorry, we do not have a link to kristen82's photos.
Details:
- Cherry cabinets, frameless, all plywood boxes and shelves, local custom made
- Granite counters..."gold veneziano" kind of similar to new ventian gold
- Natural stone backsplash from the local Tile Shop.
- Elkay stainless sink (36" wide), Whitehaus pull out faucet "Beluga" model, both items
- purchased online
- Dacor Preference RSD30 range in stainless, Faber "Inca" hood insert, custom wood
- hood with corbels to match island
- Kept my 4 year old Maytag black dishwasher and 11 year old almond GE fridge (yuck
- but it works and the new one is about $2800...will add next year hopefully). New
- panasonic under island microwave.
- Pewter knobs and pulls from Myknobs.com (bad service, BTW). They're from "Top
- Knobs."
- Wall paint color--"straw" by Ben Moore
- Yet to be done: New cabinet depth fridge is coming, but not 'till next year (either
- stainless or cabinet panelled).
- Some nice accessories and window stuff still to be decided.
beths96's Kitchen
beths96's Kitchen

Contact:
beths96 (
My Page)
Posted on Wed, Jan 14, 04
Link to kitchen photos:
http://flickr.com/photos/beths96/sets/72157594264876283/
I am finally finished enough to post pictures in the gallery. We started this project in
mid-October 2003. I had been planning for the kitchen for over a year. This remodel
comes after two years of mostly DIY work on our home, including new siding, landscaping,
refinishing wood floors, new carpet upstairs, painting galore, brand-new everything in
the bathroom, etc. I think that after two years of first-time home ownership, we’re
finally finished for a while!
Our goal for the kitchen was to keep it looking kind of like it was meant to be in our
80-year-old home. If I would have had more money, I would have been able to make
it look more "period," but I did the best I could within our budget! Because we spent
$10,000 total, I'm going to post it in the Budget Kitchens thread as well. My husband, father, and I did 90% of the work on the kitchen by ourselves. I did all
the painting, the tile backsplash, and staining the furniture, and my husband and I
worked together on scraping and refinishing the hardwood in the kitchen. We also had
a lot of help from a family friend (my parents’ next-door neighbor) and my uncle.
The only job that wasn’t done by us was the countertop. We were too nervous to do that. I originally started out wanting Premier cabinets from Home Depot. For some reason,
my kitchen designer there warned me that they were getting a lot of complaints about
Premier cabinets around that time (August 2003). So since I had to wait a long time
that day to order my cabinets, the designer offered to get me KraftMaid cabinets at a
educed price, very comparable to the Premier cabinets. So I said yes, because I’ve
always heard great things about them. Now I realize that I got framed cabinets, and I
wish I would have stayed with the Premier cabinets, which are frameless. However, I
love the KraftMaid cabinets – they are strong and very sturdy, and beautiful. Just a
word to the wise: By getting framed cabinets, I’ve lost 5 inches on every base cabinet
because of the cabinet frame. Just a little fact to ponder! J Okay, here are the details: We live in an older home, a 1923 Craftsman-style Foursquare
with 3 bedrooms and 1 bath. We would love to add on later, but we’ll see about that later.
The kitchen before was tiny, about 9.5 feet by 10 feet. We had an adjoining dining room
that was never used, so we decided to knock out that wall (non-load bearing) and combine
the two rooms. Since I had a fancy-smancy dining room set, I knew it was too big and too
formal for this room, so I sold the set on ebay! I used that money to buy unfinished furniture
(table, chairs, and counterstools). I finished them myself. The kitchen is sort of a capital G shape, if you can imagine that. I tried hard to keep the
overall look so that it would fit well in our home. We have a few built-ins in the house, and
all the interior doors are white with recessed panels, so I decided to get white cabinets with
recessed panels. I did lots of research, and decided that I wanted stainless appliances, dark
countertops, wood floors, and white 3x6 subway tiles on the backsplash. I first started out
wanting to get Blue Pearl granite, but after a while, I realized that this cost was just too
expensive for us to handle. We really did do what I consider a budget kitchen, because
although some of the materials could have been super expensive, I tried to get them at
a discount whenever I could. Plus, it’s a small kitchen, meaning less cabinets, and less money.
So I decided to go with a dark gray, almost black, laminate, and then I went from light blue
walls to red walls! I was worried about how all red would look in the adjoining dining room,
so I researched some more, and decided to create Craftsman-style wainscoting 2/3 up the
walls and paint everything white. The top 1/3 is painted red. I think it turned out beautifully. I cannot say enough about my kitchen. It has exceeded my expectations, and the fact that
we did it all by ourselves gives us such a great feeling. We could not have afforded the kitchen
if we had to pay a contractor. I know they don’t read this, but I would like to thank my
husband and my father, who both enjoyed themselves (Dad enjoyed it more than my hubby,
because Dad didn’t have to live with the mess for almost 3 months!). They were willing to do
his work on their evenings and days off, and I really appreciate it. I also want to thank all of
you for your support during this time. I had a few setbacks as you might remember during
this time, and the support from the board and concentrating on the kitchen really helped me
get through it. Here are the details: Original Budget: $10,000 not including furniture. Just made it!
Cabinets: $4300. KraftMaid Belair from Home Depot. 1 super susan, 1 fridge surround cabinet,
corner sink cabinet, 1 pots and pans drawers, 2 roll-out trays were “extras.” Countertops: $1500. (More than I expected, but that price includes labor). Wilsonart Graphite Nebula
ith no-drip edge, “flat deck,” meaning no 4” backplash. Stove: Frigidaire Gallery Electric smoothtop slide-in in stainless
PLES389A at http://www.frigidaire.com/products/cooking/ranges/slide-in/electric/prod_PLES389D.asp
Has warming drawer in bottom, expandable element, bridge element, and warming zone and convection feature on oven. Still tweaking it, but love it! Fridge: Kenmore Stainless Steel with Black 21.9 cu.ft. bottom freezer model # 72213. It has an icemaker, but we didn’t hook it up. I love this. It’s so convenient to just open it up and not have to bend over to see the fresh food items. I love the curved handles, too. http://www.sears.com/sr/javasr/product.do?BV_SessionID=@@@@0509613736.1072016883@@@@&BV_EngineID=ccicadckemljjedcehgcemgdffmdflg.0&vertical=APPL&fromAuto=YES&bidsite=KENM&pid=04672213000 Dishwasher: Frigidaire Gallery Stainless www.frigidaire.com
Everything I’ve put into this dishwasher has come clean so far, so
I’m very happy with this purchase! This is my first dishwasher and I’m so happy with it! Microwave: White Westinghouse in Stainless, bought for $50 at Kmart long time ago Disposal: Kenmore ¾ hp #60563 at www.kenmore.com, on sale for $99 Sink: Neptune by Elkay single bowl 25”x22”x7” - $59 at Home Depot. Love it! Faucet: Delta Waterfall in Stainless with soap dispenser. Model 174-SSWF. $150 on ebay.
Saved $100 from Lowe’s and Home Depot price. Range hood: Jenn Air Slide-out hood, Model RH800. I found this on ebay. I wanted a slide-out
range hood and didn’t care what manufacturer, but they were all at least $300. So I searched
on ebay, and found this one, which I believe is a discontinued item, for $160. Big savings! It’s
vented to the outside. Tile: DalTile Rittenhouse Square 3x6 Matte Arctic White with Delorean Grey grout. $225 for
materials. Was going to hire someone to install it, but decided to do it myself and save about
$400. It was quite an experience, but I’m so pleased with the result! Floors: Some type of hardwood, probably fir or pine, refinished ourselves. Ripped up four layers,
scraped, pulled out nails, sanded, stained, and put three coats of high-gloss polyurethane. Cost
about $60 to rent sander, and we already had the stain and polyurethane, so the total cost was
about $60. Paint: “Barn,” a Martha Stewart color at Sherwin Williams in satin, and American Traditions
in White semi-gloss for all trim. Furniture: Pop’s Unfinished Shaker furniture. www.popsfurniture.com. Hawthorne counter
stools, Mission-style chairs, and shaker-style table by John Greenleaf. Got a great deal on four
chairs, table, and three counterstools. $725 with free shipping. Bought them with money from
the sale of my other dining room set. I stained and poly’ed them myself. Lighting: Period lighting from www.rejuvenation.com. “Jefferson” main light in kitchen and
dining room in brushed nickel with 300-watt bulb, and “Laurel” above sink in brushed nickel.
$300 total. “Jefferson” also in dining room, but was a Christmas 2003 present! Outlets: Plugmold by Wiremold, www.wiremold.com. Expensive, but worth it. $65 at Home
Depot for two three-feet strips. One big splurge. Hardware: Bin pulls and knobs in satin nickel, bought on ebay for $56, including shipping!
Same exact knobs and bin pulls at Lowe’s would have been $160. Saved $100! Shelf Liner: Rationell from Ikea. Spent around $100. Some people prefer to leave their shelves
unlined, but I tend to be klutzy and I would be so upset if I ever had something leak onto my
new shelves. This liner is very reasonably priced ($4 a roll), is clear, and can be removed and
washed at any time. It doesn’t stick to the shelf, either, liked some types of shelf liner. I can
slide things easily around on this surface. The hardest part was measuring and cutting the
liner, and then having to use the blowdryer to make it lie flat, but it was fun after the first
few tries. I plan on staying around this forum for a very long time, so please feel free to ask me any
questions that you might have. I can’t believe we came so far in three months, but we just
wanted our house back to normal as soon as possible. I am not completely done with the
remodel, though. We’re still waiting for my dad to come down and put in the rest of the
molding in the dining room, and for that reason, I haven’t included pictures of the dining room
or the ebony-stained dining room furniture yet. It should be done by the first of
February, 2004, so I will post more pictures then. I will link to my finished pictures below. Just so you know, I’m also working on placing my
pictures on another picture site, www.photoaccess.com. I think that they have pictures that
are more clear. When I am finished posting them on that site, I will let you know. For now,
my pictures are on pbase. Also, one more thing: For new people to this site: I also have detailed pictures of the
three-month-long remodel progress on the www.pbase.com/beths96 site, titled
“Kitchen Remodel Fall 2003.” You might want to check out our progress and see what kind
of kitchen we started with! Thank you, everyone! I’ve received many emails and personal notes about my kitchen,
and the kind words I have received have meant so much to me! Good luck on your kitchens! Thanks, Kitchen Buddies!
Beth |
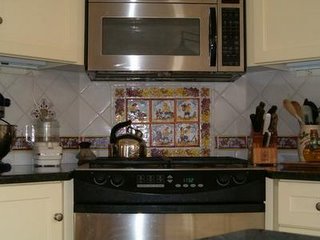
epg26's Kitchen
Dark Cherry Kitchen w/ Red walls.

I posted this a while back and it seems to have scrolled off. So here it is again: Welborn
dark cherry cabinets. Viking 36-in gas range/hood. Viking dishwasher. Sharp
microwave. Jenn-Air fridge. Formica "butter-rum granite" laminate counters. ceramic
tile floor, and B.M. raspberry truffle in eggshell on the walls. |
Here is a link that might be useful: House/Kitchen photos
mizzou_kx's Kitchen
Mizzou_KX's Kitchen

Posted by:
Mizzou_KX (
My Page) on Fri, Jan 16, 04 at 14:54
Thought I would post a summary to go along with house and kitchen photos posted in
the gallery - since I forgot to do that earlier.
Kitchen - Jenn-Air wall ovens and Refrigerator, Amana SS microwave, Bosch DW, and
Viking 48" range top, 4 burners, griddle, and grill, Viking hood with 1200 cfm blower.
Kindred sink (KSDCRU) with Price Pfister faucet. Pendant lights are Minka-Lavery -
Ancient Stone. Counters and backsplash are Juperana Sunset (3cm and 2cm). Floor
tile is Florida tile - Ankara, True Beige, 16x16. Backsplash behind cooktop is same tile
in black with Lucas inserts. Cabinets were designed by my wife and I and made by
local cabinet maker. Wall color is Benjamin Moore - Kentucky Haze AC-16.
Fireplace in living room was salvaged from an old bank building and refinished -
approx 102 years old. New surround is Rain Forest Green marble. Entertainment
center was designed to hold new TV and electronics and built by same cabinet maker.
Floors in living and dining room and 1/4 sawn white oak and site finished. Wall color is
Benjamin Moore - Puritan Grey HC-164.
Light fixtures in dining room and foyer are also from Minka-Lavery.
We did all the design work ourselves and had loads of fun but sometimes got to be a
headache. Looking forward to doing it again. Working on new set of plans right now.
Here is a link that might be useful:
Bill and Lee Ann's house
karenmaraj's Kitchen
karenmaraj's Kitchen


Contact:
karenmaraj (
My Page)
Posted on Mon, Aug 4, 03
Link to kitchen photos:
http://www.jakeandkaren.com/housesite/kitchen.html
Details:
steve_a's Kitchen
Steve_A's Kitchen


Posted by:
Steve_A (
My Page) on Fri, Aug 8, 03 at 13:46
Our kitchen was finished about a year ago, August 2002. Kraftmaid cabs, Sahara granite (vendor's name for a type of Juperana), GE, K-A, Asko appliances, Italian tile with black granite accent. We are in the Washington DC/Maryland suburbs. Steve
Steve_A New Website
Posted by:
Steve_A (
My Page) on Wed, Jan 28, 04 at 19:14
Sorry to post here again, but I've built a new website with kitchen and bath pictures.
The old website will soon cease to be. Please check out the new one at the link below. I
will also post on the Bathrooms Gallery. Steve
Here is a link that might be useful:
Steve & Joette's Kitchen/Bath Pictures
http://mysite.verizon.net/vze7z0ym/
joynserf's Kitchen
joynserf's finished kitchen


by
joynserf (My Page) on Wed, Mar 24, 04
link to kitchen:
http://www.photoaccess.com/share/guest.jsp?ID=AB773D29D7C&cb=PA
Details:  Cabinets: Kraftmaid Piermont Cathedral Honey Spice Maple from HD with all full-extension drawers and APC (All Plywood Construction)
- Verde Butterfly Granite Countertop
- Tembec Muskoka Red Oak Clear Hardwood Floors
- Kitchenaid 30" Architect Series Double Convection Oven (KEBC208KSS)
- Kitchenaid 4" console dishwasher (KUDS01IJBS)
- Amana Bottom Freezer EasyReach (ARB2217CSL)
- Miele MasterChef 36" Five Burner Gas Cooktop
- Vent-a-Hood NPH9-236-SS
- Panasonic Convection Microwave (NN-T888S)
- Grohe Ladylux Plus in SS
- Grohe Deluxe Soap Dispenser
- Elkay Single Bowl Undermount Sink with Reveal (ELUH2816)
- Porcelain Tile Backsplash
- Slim fluorescent undercabinet lights
- Brush nickel 128mm pulls
Neat Features learned only from this GREAT forum:
- Tapmaster – hands-free faucet activation
- Hafele Folding Toekick Step Stool
- Hafele Pull-Out door Opener with a tap of the foot
- Toekick drawers
- Lifeliner – drawer/shelf liners
We’ve been at it for a year now. Demolition started during the blizzard of 2003. Gutted everything and tore down a wall. I can say that it’s 99% done. All DIY except wood floors which we had a friend’s floor guy put in and the brickwork involved in closing in the exterior door in the kitchen. The total cost of the renovation is close to 22K.
Made DH build the trashcan pullout and the toekick drawers after hearing about it from here. He wasn’t too happy that I came up with more work for him and told me not to read the forum but now he’s thrill with it and shows it off whenever possible. We used the Accuride drawer slides with overtravel. These are some great slides. Incidentally, these slides are also from Hafele. They do have some great products.
Neat feature that didn’t get incorporated:
Plugmold - Found out about it too late and DH was not about to redo all the electrical again.
Neat Ideas for extra doors/parts for the cabinets due to bad workmanship:
Cut the edge of the doors and use it for moulding for the bottom of the wall cabinets, which keeps the undercabinet lights from view.
Build a microwave shelf.
Follow-Up Postings:
RE: joynserf's finished kitchen
- Posted by: joynserf (My Page) on Wed, Mar 24, 04 at 2:22
DH wants his voice heard:
This is a follow-up to Joy’s post of our kitchen. This is the DIY portion of the kitchen renovation.
Some initial points:
- This is being written by the DH who is an engineering geek. (I am told one translation is Dear Husband and I’ll stick to that).
- Although I did tell my wife to stop reading this news group, it has provided a number of very useful ideas that have been incorporated into our kitchen. Thank you to all who posted their kitchens and research.
- My wife did all of the research for the kitchen, ordered all of the items, and coordinated the four sub-contractors that did a small portion of the renovations (granite counters, brick work to move door, window install, wood floor). Also, if one is capable of the DIY renovations done for this kitchen, then one could also do the window and floors. See Joy’s post listing the items used in the renovation.
- Renovation took 1 year, 6 months without a functioning kitchen.
- A working sink during the renovation is a "must". We left the sink cabinet in place and hacked the counter off about 1 foot on either side. Several times I needed to take the temporary sink out and then reinstall it.
- Take pictures of everything in the walls before you close up so you know were everything is routed.
Here is a list of most of the items done for our renovation:
Remove Dining room wall – This was a non-load bearing wall so structurally, no modifications were needed. However, make sure you don’t cut any electrical wires in your zeal to use your new reciprocating saw. We needed to re-route the phone line and electrical wiring that was in the wall.
Remove back door, close opening, insulate, and make a new wall flush with existing kitchen wall. Our house is brick and block construction so I needed to fill in thicker than just 2x4s.
Remove all cabinets – We saved these and used a number of them on the wall above the washer/dryer. Our daughter also uses one in her play kitchen.
Remove existing soffits – We ran the cabinets to the ceiling to maximize cabinet space.
Remove back and side walls to expose the studs and electrical wiring – Note, I have generally found that it is easier to just rip everything out for good access, and then put back new sheet rock. However, in my case I have an early form of very thick and hard wall board with a plaster skim coat. So I did not want to remove the ceiling since the two standard sheet rock sizes would not be as thick and I would have a problem joining the kitchen and dining room ceilings.
Remove vinyl floor and underlayment
Remove stove vent – This was routed through a wall and the joints leaked causing the kitchen odors to get into the basement. Also, the route had two 90 degree turns with decreases air flow and makes more turbulence and noise. We installed an 8 inch diameter vent straight up through the cabinet and out the roof.
Remove all the electrical wiring
Install new electrical wiring to current NEC (National Electric Code) and local jurisdiction requirements. In addition, I upped all wiring to 12 gauge which is rated for 20 Amps (vise 14 gauge rated for 15 Amps). In my case, I put in the following
- two GFI 20 Amp circuits for counter outlets for appliances
- 20 Amp circuit for microwave
- 20 Amp circuit for fridge
- 20 Amp circuit for stove igniter, stove vent, outlet over stove in cabinet for under counter lights and possible cabinet mounted radio/CD player. Also, it is nice to have two different circuits for the lights in a room when one is doing electrical work.
- 20 Amp circuit for lights
- 20 Amp circuit for dishwasher
- 20 Amp circuit for garbage disposal
- 20 Amp circuit for future deck (while we were doing exterior brick work)
- 40 Amp circuit for double oven
Install recessed lighting & peninsula pendant lighting
Install wiring for under counter lights – This will be fed from an outlet in the cabinet above the stove. Pre-ran wires to bottom of each cabinet. However, I did not put in a wall switch when I tiled since I originally planned to use one of the small touch sensitive switches with puck halogen lights. Thus I used a remote control RF switch on the outlet.
Install phone, CAT5 cable for hardwired network capability, speaker wire for deck (runs from living room down into basement, then up exterior wall of kitchen and into attic)
Install gas to stove
Install new plumbing cutoffs – We used 90 degree cutoffs. They last much longer and have very positive shut off. They are only a few dollars more than the typical cutoff valves that like to freeze up if they are not turned on/off once a year. Take into account how it will fit into sink cabinet with the garbage disposal and cutoff valve handles for turning. It was a tight fit with plumbing, garbage disposal, faucet with pullout (requires hose in cabinet to pull out), hands-free faucet control, hands free garbage can drawer.
Insulate
Install wall material – I used 3 / 4 inch plywood. This gave me more latitude in where I could put screws to hold the cabinets to the walls. However, I still tried to screw to studs also. Mark the wall material so you know were the studs are for screwing to.
Install upper wall cabinets – Do this before the floor, and there is one less set of things you can potentially drop on the new floor. Make sure you find the lowest point on your ceiling as your reference to set the top of the wall cabinets. Then use 2x4s set at the lower edge of the wall cabinets and screwed to the wall to assist in wall cabinet installation. You then have a level reference that you can place the cabinets on as you screw them to the wall.
Install A/C heating vent – re-route vent from wall which would be blocked by pantry cabinet to come up through floor and out pantry cabinet toe kick.
Install floor – Screw down all the underlayment and sand off any high spots. We installed tongue and groove pre-finished wood floors. We ran the floor from wall to wall going under the cabinets. We put the short wood pieces under the cabinets. This made installation of the dishwasher easier. Otherwise, there is the potential that the floor thickness could cause the gap between the floor and the counter top to be to short to slide in the dishwasher.
Build and install toe kick drawers – For additional storage of otherwise unusable space. I build drawer boxes, removed the toe kick front, mounted the drawers on over-extending rails to allow clearing the toe kick overhang, and reinstalled the toe kick as front of drawer.
Install step ladder in toe kick – This has proven to be a very useful item in a convenient location.
Install lower cabinets – Find the highest point on the floor and use that as the reference for the bottom of the cabinets. This is opposite that of the upper wall cabinets.
Install toe kick molding
Install foot activated sliding garbage can cabinet – This has also proven to be very useful since it is under the sink and does not require any hands to open or close (we use our knee to push it shut). See pictures
Cut opening for double oven in cabinet – This required both cutting a very expensive cabinet. Then installing a platform to set the oven on.
Install full height oven and pantry cabinet – For us, the toe kick was separate from the cabinet. However, since one needs to tilt a cabinet up to a vertical position one needs a higher ceiling than the cabinet height (less the separate toe kick). In our case the cabinet that would reach to ceiling was in fact about 1 / 2 inch to tall. Instead of going to a cabinet 4 inches smaller, we cut the toe kick down 1 /2 inch.
Install oven
Install stove hood and vent – Note, we tried to find the thinnest (least height) hood to minimize cabinet space loss which still had good performance (high cfm). I also wanted a cabinet over the hood that was functional. The vent was the straightest shortest run possible to maximize airflow and minimize noise. Our vent runs straight up through the cabinet and roof a total of about 8 feet.
Install custom build microwave shelf – Kraftmaid did not have a microwave shelf for the width cabinet we wanted, so I build one from the spare doors that were replaced due to damage or workmanship issues.
Install sink – In our case, to get the under counter sink we wanted and the cabinets to fit the room, we actually needed to knotch the cabinet sink. That is the sink is as wide as the cabinet. So it needed to be installed before the counter top. Should we ever need to change it, we will likely need to cut out the entire right side panel that faces the dishwasher.
Install counters
Install stove – Modified top drawer under stove by trimming off 3 / 4 inch and notching the back of the drawer around the gas line so that draw was still usable.
Install faucet and hands free control
Install dishwasher
Install garbage disposal
Install trim on lower edge of wall cabinets – cut edges of defective doors to use as cabinet trim.
Install under cabinet lighting - These would be the final 5 lights of a total 17 lights in the kitchen. Fortunately both of use like a lot of light.
Install drawer and cabinet pulls – Make wood jigs so that the pulls end up in the same place on all of the drawers and cabinets. Just an interesting note, we bought European (metric) sized pulls and the US company kept sending up English size screws. My wife eventually ordered screws separately from the Haffele catalog.
Install tile – This was very laborious. It took 5 days to do the two walls. Two things made it even more difficult. First, setting tiles on a 45 degree orientation makes one put tiles in stacked on a 45 slope. So as one places the tiles, they tend to want to slide down the 45 degree slope. Also, we have small inlays every other tile. And finally, we put in a lot of outlets to cut around. I had previously purchased a wet tile saw for about $300. These cuts are not possible using a score and break type of tile cutter.
Install icemaker – Not done yet (is a renovation every truly finished?)
Some of the things that I really like that are not always found in this level of renovations are the hands free faucet and garbage can drawer. The step stool is really nice for when our 3 year old daughter want to help in the kitchen. It is easily accessible and does not take up cabinet space.
Some of the other features that definitely are useful are full extention drawer slides, the drawers for pots and pans, and the EZ reach corner wall cabinet.
The curve on the granite peninsula end really looks nice and adds a level of sophistication to the kitchen.
The Pella window has an integrated mini-blind that is between the glass. This makes keeping it clean in the kitchen environment much easier.
My wife says no one will get this far. However, if you do, I hope this was helpful.
RE: joynserf's finished kitchen
- Posted by: janemarie5 (My Page) on Wed, Mar 24, 04 at 6:21
What a beautiful kitchen!! I am very interested in how you did the bottom drawers. How did you go about doing that?
Did you order spare drawers from manufacture with the glides? How did install go? I really think this might be a solution to my problem as I didn't get enough drawers for my kitchen. Thanks for any input. |
RE: joynserf's finished kitchen
- Posted by: Monicakm (My Page) on Wed, Mar 24, 04 at 6:30
I did! I got all the way to the bottom :) What a WONDERFUL kitchen! All your hard work and research has paid off big time! How do you like the Tapmaster? Isn't it just the greatest thing :) I love your big wide drawer under the cooktop. The hands free trashcan opener...cleaver, cleaver, claver! It's all very nice and I know you'll enjoy it for many many years :)
Monica |
RE: joynserf's finished kitchen
- Posted by: KirstenWI (My Page) on Wed, Mar 24, 04 at 6:38
What a beautiful kitchen! Your photographs are excellent. And count your blessings to have such a handy and clever husband!!
Kirsten |
RE: joynserf's finished kitchen
- Posted by: ShelleyFL (My Page) on Wed, Mar 24, 04 at 6:40
| Beautiful kitchen! You must have so much pride in it knowing DH did it himself. What a talented husband! You have great taste in your selections. You guys make a great team! CONGRATULATIONS! |
RE: joynserf's finished kitchen
- Posted by: riverrat1 (My Page) on Wed, Mar 24, 04 at 7:19
| Very nice! Congratulations on a job well done. |
RE: joynserf's finished kitchen
- Posted by: MickeyJ2 (My Page) on Wed, Mar 24, 04 at 7:37
| Yep, I read EVERY word! Is DH available to come help me?? I see you are just a couple of states north of us! Or is he totally exhausted? I do have a serious question! I see you ran your cabinets to the ceiling. They look like they are framed with full-overlay doors (maybe?). 8 ft. ceiling? You have no crown mold. I like the look without it, but are you not able to use a crown with the over-lay doors? Too close to the ceiling? This is a concern I am having. We ordered the crown mold but now I'm thinking we may not be able to use it since we ordered framed 42" uppers with full-overlay doors. After seeing yours, though, I may not WANT to use it! Fabulous kitchen...what a team effort. Enjoy!!
M |
RE: joynserf's finished kitchen
- Posted by: legallin (My Page) on Wed, Mar 24, 04 at 7:59
| Wow! It is beautiful. And, I can't believe how much you got for your money. DH did an amazing job -- he should go into the kitchen business. It looks like one of the most functional kitchens I've seen. Linda |
RE: joynserf's finished kitchen
- Posted by: Elizabeth_B (My Page) on Wed, Mar 24, 04 at 8:56
| Amazing!!!! What a beautiful kitchen you have created. I love the step stool ~ I have to find out if it is too late for me to add that (I think it may be). DH ~ I did make it to the end and read every word. I have even filed some things away for when I get to that point. Elizabeth |
RE: joynserf's finished kitchen
- Posted by: bernice44 (My Page) on Wed, Mar 24, 04 at 8:58
| Gorgeous!!, I love how you managed on the budget. Love the extras, toe kick drawers and Speakers on the deck. I don't know if 6 mos without a kitchen would work for me but considering the savings... You are both an inspiration. Enjoy your new space with pride. |
RE: joynserf's finished kitchen
| VERY nice kitchen!! Congrats on a job well done and mostly DIY. Very impressive and inspirational. |
RE: joynserf's finished kitchen
- Posted by: LilaThabit (My Page) on Wed, Mar 24, 04 at 10:09
| Wowee wow wow. I can't believe it was mostly DIY. Congratulations guys on a GORGEOUS kitchen! |
RE: joynserf's finished kitchen
- Posted by: Paloma2001 (My Page) on Wed, Mar 24, 04 at 11:23
| Wow! This needs to go in the budget kitchens thread. Shows what a little (lot!) of elbow grease gets you. And I LOVE the backsplash! Can we clone your DH? Pal |
RE: joynserf's finished kitchen
- Posted by: young5344 (My Page) on Wed, Mar 24, 04 at 13:30
| Beautiful. You should be very proud. Thanks so much for your detailed info. |
RE: joynserf's finished kitchen
- Posted by: femmelady (My Page) on Wed, Mar 24, 04 at 13:35
| What a great kitchen! Those blue pendant lights are wonderful, and I would guess play really well with the verde butterfly granite. It looks like you might have quite a bit of gold in it too. Always harder to tell in photos. They never give that gorgeous granite the justice it deserves! Thanks for all the "opened" photos. I think it helps to see the inside as well as the out. You should be very proud!! You have a wonderful and well functioning kitchen. Enjoy! |
RE: joynserf's finished kitchen
- Posted by: TexasGal5 (My Page) on Wed, Mar 24, 04 at 17:04
| Oh I am SO jealous of the usable space under your cooktop!! Your kitchen is so beautiful...I love the cabinets! |
RE: joynserf's finished kitchen
- Posted by: knroberts (My Page) on Wed, Mar 24, 04 at 21:11
| Fabulous kitchen with so many storage solutions. It's very impressive and I can only imagine that a DIY or an exceptional GC would tolerate that level of detail. You should be so proud of doing a great job. Enjoy! Karen |
RE: joynserf's finished kitchen
| Great kitchen with lots and lots of storage. You used every inch of space. You are couple that obviously can work together. Congratulations on a job well done! |
RE: joynserf's finished kitchen
- Posted by: compumom (My Page) on Thu, Mar 25, 04 at 0:14
| What a great kitchen, hard to believe it was a DIY on that budget. You used good planning for storage, it was well thoughtout. I wish I worked as hard on the pull-outs etc. |
RE: joynserf's finished kitchen
- Posted by: joynserf (My Page) on Thu, Mar 25, 04 at 0:21
| Thanks for all of the complimentary posts. It was a lot of work and I appreciate the positive feedback (DH). Janemarie5 ************************************************* These were installed prior to installing the cabinets. There was a magazine article about 6-14 months ago that discussed how one person did a retro fit. I think is was Handyman and I will look for it. It could have been This Old House or Fine Woodworking. It has pictures that would help. His method lost a time bit more height in an already very short space. They had to build a three sided box to mount the drawer into. Then the three sided box and drawer were slid under the cabinet. In my case, Joy ordered Hafele Accuride full suspension ,side mount, with 1 inch over-travel slides. They were 16" slides that extend out 17 inches to allow for almost clearing the toe kick overhang. The slides need to fit in the under cabinet depth which loses the toe kick set back and the back of the cabinet thickness. I turned the cabinets upside down and carefully removed the front of the toe kick. This needs to be reinstalled on the front of the draw to retain the same finish. I build a drawer box that was carefully measured to be the width of the area beneath the cabinet less the thickness of the slides. You may want to trim this by about another 1 / 8 of an inch. If the drawer is too wide with the slides then you are screwed because it won’t fit and if you force it, it won’t slide smoothly. On the other hand, if it is a little too small, you can shim the slide out with a thin wood space. In building the box, it is critical the left and right sides are parallel or else the drawer will not slide well. The depth was close to the maximum depth such that the front of my drawer box aligned with the back of where the toe kick front was originally located. When I set the slide location I put it about 1 /8 of an inch back so that the self closing slides would pull the toe kick front snugly into its original location. The box was constructed from pine. The box sides and back were cut and sanded. Then I used a table saw to cut just wider than 1 / 8 inch grove near the inside bottom of each side and front and back piece. Cut was about 1/3 depth of wood thickness. I then cut a 1 / 8 thick piece of oak faced plywood. This was slid into the grove for the bottom of the draw. You could cut the grove with a circular saw or router, but the table saw was easiest. I then used a biscuit joiner to cut notches into the corners to insert biscuits and glued the sides and back together. Biscuits are flat football shaped wood pieces inserted half into each piece of wood to be joined. Glue is applied to the notches, biscuit inserted, wood pieces clamped together and allowed to dry. For additional joint strength, I also notched the corners to increase the contact area for the glue. Again used table saw but could do with circular or router. I did not dovetail the joints because I don’t own the proper template (if that is what it is called). I then mounted the draw, less the toe kick front. This was to ensure the draw operated smoothly and did not drag the front when fully extended. So it is important to make sure the slides are level or maybe even slightly tilted up. When the drawer has more weight it may sag in the front so it must be mounted high enough to prevent dragging. The actual height of the box does not need to be the maximum since most things put into our draw are flat and will not fall over the sides. Finally, need to trim the toe kick shorter (height wise) so it does not drag either. It was originally installed from floor to top of toe kick space so it is too tall to mount as the drawer front and still allow opening the draw without dragging. After trimming, mount it to the front of the draw. Then install a handle. Now for those who don’t have biscuit joiners, Handyman Feb 2003 page 23 describes an inexpensive pocket hole jig tool that allows for screwing the draw together. The screws would be on the back of the draw and one the front. The front is then covered with the toe kick panel. Thus no screws show. Monicakm *************************************************** We like the tapmaster although we now are kicking toe kicks whenever we want water to come out of a faucet. And it really confuses people who do not know we have it. I have noticed water flow is a little low and that may be due to restrictions put into the Grohe faucet (per my wife’s research). Just have not had a chance to look at it. Mickeyj2 *************************************************** We have full overlay doors. The ceiling is 8 foot. We do not have crown molding. We were attempting to maximize storage space and wanted the 42 inch tall wall cabinets. At the same time one wants to maintain sufficient space between lower cabinets and wall cabinets. In addition our lower cabinets sit on top of the wood floor that covers the entire room (including under the counters). We also used damaged doors to make molding along the lower edge of the wall cabinets to hide the under counter lights. Using the cabinet doors guaranteed that the color and edging matched. The final space between counter and wall cabinets with molding was 17 inches. In addition, one needs to plan on some loss from the 8 feet for floors and ceilings that are not level. The lower cabinets need to set level to the highest point on the floor under the cabinets. While the wall cabinets need to be set level to the lowest point on the ceiling over the cabinets. For us the floor was off about 1 / 2 inch and the ceiling about 1 inch. We still plan on putting some small trim above the cabinets to cover the varying width gap between cabinet top and ceiling. Note, this gap is not particularly noticeable. And if we had the space, we would probably put in crown molding, but we don’t. Elizabeth b************************************************ The step stool is easy to retro fit, since it does not mount to the cabinet in any way. You need to have a cabinet that it fits under. Note you need some clearance between the cabinet sides to get it to roll easily. Our cabinet was 18 inches wide outside dimension. Carefully pry off toekick. Trim to be shorter in height. Attach to the front of the step stool, add a handle, and slide in. Note, due to how Kraftmaid constructed the toekick area I had to make a minor modification. Under the cabinet behind the toekick there were some support blocks on the inside that supported the bottom of the cabinet. These narrowed the width about halfway back. So I cut thin wedge shapes and attached it to the insides of the cabinet sides to direct the stool to the center of the cabinet (left right center) as it is rolled in. |
RE: joynserf's finished kitchen
- Posted by: elsieCat (My Page) on Thu, Mar 25, 04 at 1:06
| Printing your posts out--what incredible generosity and energy after such protracted labor... BEAUTIFUL! And it's a labor of love that both of you created together! I'm in awe of how you took lemons and made molding and a microwave shelf out of them :) Completely inspiring, both of your writings will be revisited frequently. A masterful example of why this forum is ***so great***. |
RE: joynserf's finished kitchen
- Posted by: Merjan (My Page) on Thu, Mar 25, 04 at 12:02
| GORGEOUS kitchen! Congratulations on a job well done.... you could tell that you guys put a lot of thought and effort into this project. Our granite, our floors, and layout are identical :) |
RE: joynserf's finished kitchen
- Posted by: bwjones (My Page) on Thu, Mar 25, 04 at 12:18
| I love it! Thanks for detailing what you did. Enjoy your new space. |
RE: joynserf's finished kitchen
- Posted by: SDchica (My Page) on Thu, Mar 25, 04 at 16:22
| CONGRATULATIONS! What a wonderful inspiration to those of us who plan to DIY. This also renews my enthusiasm after a few weeks of inactivity (we completed the demo and then my husband was pulled into a nasty project that has taken his weekends for the past month or more) - after seeing yours, I know it will ultimately be worth the wait. I enjoyed seeing all of your ingenious little tricks for maximizing space. I've been frantically cumulating these sorts of tricks for over a year (we've already planned toekick drawers and the tapmaster). And my DH will likely read through your DH's entries to learn as well. Hmm, we'll have to take another look and see what brilliant ideas I can blatantly steal . . . thanks so much! |
RE: joynserf's finished kitchen
- Posted by: MickeyJ2 (My Page) on Thu, Mar 25, 04 at 17:25
| Thanks, Joy, for your reply. I was afraid my question had become imbedded in all of your compliments. And they are well deserved compliments, BTW, as you and DH did a fantastic job! I understand exactly what you said. We discussed lowering the uppers to accomodate the crown mold but I'm concerned now about the space between the upper and base cabinets (which will also sit on a wood floor). And I didn't even THINK about a molding to hide the undercabinet lights. So I will pay careful attention to these things when the install begins. Continue enjoying that GORGEOUS kitchen!!
M |
RE: Finished Kitchens - Pic Links Only, no responses please
| We’ve been at it for a year now. Demolition started during the blizzard of 2003. Gutted everything and tore down a wall. I can say that it’s 99% done. All DIY except wood floors which we had a friend’s floor guy put in and the brickwork involved in closing in the exterior door in the kitchen. The total cost of the renovation is close to 22K. Here’s the spec: Kraftmaid Piermont Cathedral Honey Spice Maple from HD with all full-extension drawers and APC (All Plywood Construction)
Verde Butterfly Granite Countertop
Tembec Muskoka Red Oak Clear Hardwood Floors
Kitchenaid 30" Architect Series Double Convection Oven (KEBC208KSS)
Kitchenaid 4" console dishwasher (KUDS01IJBS)
Amana Bottom Freezer EasyReach (ARB2217CSL)
Miele MasterChef 36" Five Burner Gas Cooktop
Vent-a-Hood NPH9-236-SS
Panasonic Convection Microwave (NN-T888S)
Grohe Ladylux Plus in SS
Grohe Deluxe Soap Dispenser
Elkay Single Bowl Undermount Sink with Reveal (ELUH2816)
Porcelain Tile Backsplash
Slim fluorescent undercabinet lights
Brush nickel 128mm pulls Neat Features learned only from this GREAT forum: Tapmaster – hands-free faucet activation
Hafele Folding Toekick Step Stool
Hafele Pull-Out door Opener with a tap of the foot
Toekick drawers
Lifeliner – drawer/shelf liners Made DH build the trashcan pullout and the toekick drawers after hearing about it from here. He wasn’t too happy that I came up with more work for him and told me not to read the forum but now he’s thrill with it and shows it off whenever possible. We used the Accuride drawer slides with overtravel. These are some great slides. Incidentally, these slides are also from Hafele. They do have some great products. Neat feature that didn’t get incorporated: Plugmold - Found out about it too late and DH was not about to redo all the electrical again. Neat Ideas for extra doors/parts for the cabinets due to bad workmanship: Cut the edge of the doors and use it for moulding for the bottom of the wall cabinets, which keeps the undercabinet lights from view.
Build a microwave shelf. |
Here is a link that might be useful: joynserf's kitchen
debdy's Kitchen
debdy's Kitchen

Contact:
debdy (
My Page)
Posted on Fri, Mar 19, 04
Link to kitchen photos:
Sorry, we no longer have a link to debdy's photos.
Details:
- yellow Omega cabinets in maple with Shale paint
- Bosch DW
- corner range Dacor dual fuel
- Kenmore refrig
- Uba tuba granite; dark with lots of gold flecks
- Kohler sinks and faucets
- Mirage wood floor
- island light from Accent design
- backsplash tiles from Spain
- 9 foot island, seats 6 very comfortably
Features:Corner Range
sixdykstras' Kitchen
sixdykstras' Kitchen

Posted by:
sixdykstras (
My Page) on Mon, Sep 29, 03 at 0:04
Well, before my post drops off the the second page, I thought I'd add my kitchen to this thread. Thanks for starting it Wendy. :-)
Well, I'm not finished yet, but I am FINALLY posting pictures, yea!!! Our DIY project began on December 28, 2003 after a leaky pipe was discovered. I had been researching cabinet choices, etc. since October, but had nothing firm yet. Well, here are the specifics:
Pecan Cabinets by Omega -- Embassy's Plainfield style with Autumn finish
India Red Granite Counters by Silk Road Caravan a DIY project -- ebay -- Matching tile for the backsplash from Expo
Elkay sink with 10" deep bowl on the left -- ebay
Mico Seashore faucet in Satin Nickel -- ebay
Kenmore Elite Navigator Microhood -- ebay
Kenmore Elilte Duel Fuel Range -- Scratch & Dent Isle
Kenmore Trio Frig -- my BIG splurge
Fisher & Paykel Dish Drawers with Integrated Panels -- My favorite purchase!
Hydromaid Disposal
Pasta Drawers
Corbel from Van Dyke's
Seedy Glass in the cabinet doors
New dishes -- Martha Stewart Collection :)
We have trim work to finish yet and the lighting for under cabinets and over the sink has not been purchased yet. There is some beadboard work to finish yet too. We are probably 90% complete. I wonder if it will ever be 100% :)
Thanks for all of your help and support during this project! I couldn't have done it without ALL of YOU!!!
Kathy :)
Here is a link that might be useful: Kathy's Kitchen
editor's note: this is the updated link:
http://www.pbase.com/6dykstras/kathys_kitchen&page=1
ecfamily's Kitchen
ECFamily's Kitchen


Contact:
ECFamily (
My Page) Posted on Sat, Feb 21, 04
Link to kitchen photos:
http://share.shutterfly.com/action/welcome?sid=8ActGjRq5YtXCA
Details:
- Sapphire brown granite
- Vent-A-Hood hood
- Dacor ERD30 dual fuel range
- Bosch dishwasher
- Franke sink
- Grohe alira faucet
- Dacor convection/microwave oven
- KitchenAid superba fridge
- Pottery barn Tibetan bar stools
Here are pictures of our finished kitchen. We are so happy with it! This kitchen planning
community was a tremendous help to us. Thank you all.
Laurie & Pearson
bernice44's Kitchen
bernice44's Kitchen


Contact:
bernice44 (
My Page)
Posted on Wed, Apr 14, 04
Link to kitchen photos:
http://www.bolin.ca/kitchen_reno/Final/Final.html
Materials:
- Dacor Duel Fuel 30" Slide in Range with Pop up vent
- Sink - Blanco Supreme U2
- Faucet - Grohe Alira pull out with spray
- Backsplash - Cream Tumbled Marble with Oyster Grey Grout set on diagonal
- Cabinets - Ikea Askerum with 5" brushed satin nickel pulls
- Countertops - Granite - White Beaches aka Piracema White
- Refrigerator - KA S/S
- Microwave - KA
- Dishwasher - Bosch
- Under cab lighting
- New sliding door to deck
- Moved wall 24" into garage
- Glass block window over sink
- Floor - Congoleum Ultima Sonoma Taupe
- Paint - BenJMoore - Sommerville Red
- Stools - Amisco Industries Paul Stool
- Some custom work includes uppers used as bases, corner cabs, custom bottom on end cab and trim on microwave
ophiemom's Kitchen
ophiemom's Kitchen

Posted by:
ophiemom (
My Page) on Sun, May 23, 04 at 2:05
| Everything is done except moving in the fridge, installing the hardware, and painting the walls. Materials:
Kraftmaid, Maple Honey Spice, Somersworth (Mandalay) cabinets from HD, ogee molding used for crown molding and light strips.
Undercab lights - GE light strips from HD
DCS 30" all gas range
Ventahood Noveau Hood
GE Profile dishwasher
Mico Profili Faucet
Blanco 510-887 SS sink Granite: Tropical Brown with ogee square edge.
Backsplash tile: Italian ceramic tile purchased locally. Oak floors with clear satin stain. |
Here is a link that might be useful: My almost done kitchen
editor's note: the updated link is http://community.webshots.com/user/ophiemom
buckets' Kitchen
buckets' Kitchen


Posted by:
buckets (
My Page) on Sun, May 23, 04 at 20:50
The stuff:
Heritage maple cabinets with butternut matte finish
Silver sea green granite with eased edge
Blue Slide Art Tile backsplash
Belwith Keeler Jamestown Accents knobs/pulls in pearl nickel
Oak floor
Viking 30" VGIC all gas range, unsealed, no self-clean
Subzero 650 36" stainless fridge
Kitchenaid 27" microwave/convection oven (in island)
Miele Touchtronic G892
Sirius powerpack hood and Sirus hood canopy
Franke PRX120 sink
Rohl pull-out faucet in satin nickel
Waste King 3/4hp disposal
WaterX water filter for faucet & icemaker
Here is a link that might be useful: buckets' kitchen


0 comments:
Post a Comment