jacobse's Kitchen
Nearly complete kitchen photos
Contact:
jacobse (
My Page)
Posted on Mon, Feb 27, 06
Link to kitchen photos:
http://photobucket.com/albums/e185/jacobseDetails: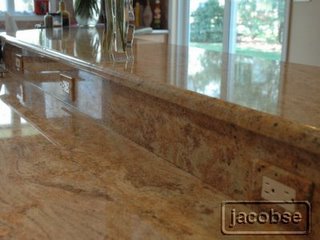
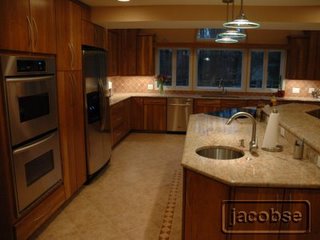
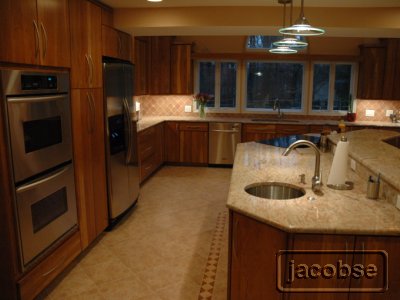
- Cabinets: KraftMaid cherry, "Malibu" style slab doors, Honey Spice finish, full-extension drawers with Blumotion dampend closers
- Refrigerator: KitchenAid side-by-side full-depth, 25 cu ft, stainless steel curved doors with "Architect" curved handles, model KSRA25CNSS
- Oven: KitchenAid double ovens, 30" wide, convection in upper oven, stainless steel doors with "Architect" curved handles, model KEBC207KSS
- Dishwasher: KitchenAid "S" series with integrated controls and display on the door, stainless steel with "Architect" curved handles, model KUDS02SRSS
- Microwave: KitchenAid built-in, 24" wide, 1.4 cu ft, stainless steel pull-down door with "Architect" curved handles, model KBMS1454RSS
- Cooktop: Thermador 36" electric 5-burner with "zone smart" auto pot/pan detection, black, model CEP365ZB
- Vent: Thermador telescoping downdraft, black, with internal 600 CFM blower, models UVC36AB and VTN600CVA
- Main Sink: Blanco "1-3/4" bowl Blancowave stainless steel undermount, model 510-882, with matching stainless steel sink grids
- Faucet: Hamat Ergo pull-down spray, stainless steel, model 3-2869ST
- Prep Sink: Elkay 16" round stainless steel undermount, model ELU16FB, with matching sink grid
- Faucet: Grohe Ladylux Cafe Pull-Out, stainless steel, model 33 765 SD0
- Soap Dispensers (2): Grohe soap dispenser, stainless steel, model 28 857 SD0
- Air Switches (2): Brasstech, stainless steel, model 111/20
- Garbage Disposers (2): InSinkErator model 777
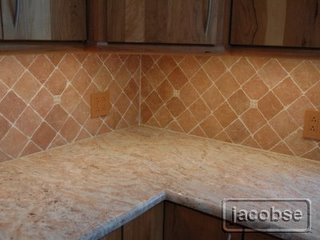
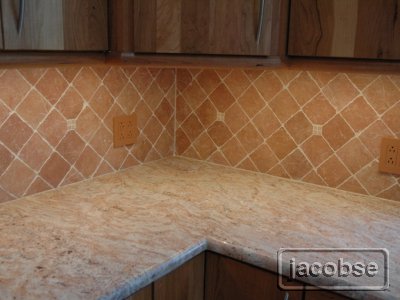
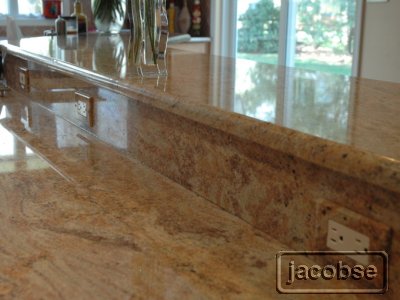
- Granite: Golden Oak
- Floor Tile: Ceramiche Tempra Arizona in Ocre, 12x12 porcelain tiles; (4" wide listello border manufacturer unknown)
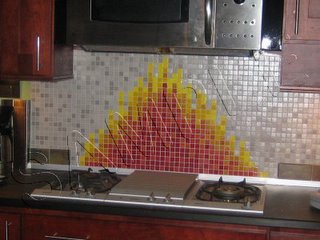
- Backsplash Tile:Kamen in Mattone, 4x4 tile; 5/8" tumbled marble, Crema Valcenica colored inserts (manufacturer unknown)
- Pendant Lights (Over Island)(3): Kichler Galaxie 10" glass, brushed nickel finish, model 2641NI
- Pendant Lights (Over Half-Wall)(2): LBL Lighting Madeleine blown glass in Tortoise, model HS268TO1A35MPT
- Mini-Recessed cans in "light bar": Lightolier low-voltage 3.5" fixture, model 303MRE, with stainless steel gimbal trim ring, model 313STX
- Recessed ceiling cans: 6" cans selected by electrician (brand unknown)
- Undercabinet Lighting: Kichler xenon hard-wired 12" (model 10580-WH) and 21" (model 10581-WH)
- Switches, Receptacles, Dimmers: Lutron Maestro dimmers, Lutron Diva Switches, Lutron Claro faceplates in white (for walls) and Satin Color Teracotta (for backsplash)
- Granite faceplates: Columbia Gorge Stoneworks faceplates made from our granite
- Drawer/Door Pulls: Lee Valley Tools stainless steel bow pulls in 5 sizes: 128mm, 192mm, 224mm, 288mm, 352mm
- Windows & Door: Andersen casement windows, picture window, circle-top window, sliding patio door
- Skylights: Velux electric venting skylight with electric shade
Well, it's taken me awhile to get the pictures together, but I'm finally posting our (nearly) complete kitchen photos. We're still missing our barstools and a glass table which will span a half-wall into the family room, a few paint touch-ups, and the like, but we're happy to be mostly done -- and incredibly happy with the outcome. As you can see from these before-and-after shots, it was
quite a transformation!
Our house is a 26 year-old Colonial. DW and I have lived here for nearly 19 years. The kitchen was a little small, the appliances a bit outdated, but it never used to bother us much. We finally started thinking about remodeling about 3-4 years ago, but after a kitchen designer our neighbors had used gave us a floor plan pretty much identical to our old kitchen because "there's not much you can change with this space and traffic flow", our planning stalled. We wanted a bigger kitchen. We wanted an island. We wanted more storage space. We did nothing.
Until... a washing machine hose in the adjoining laundry room burst in August, 2004, flooding much of the first floor and basement. Not exactly Noah's Ark, but a clear signal that it was time for us to make a move. We decided to bite the (expensive) bullet and bump out in order to have more space for the things we wanted. From the first KD, who proposed a 4-foot addition (she didn't last long), to 8-feet, to our eventual nearly 11-foot addition, the kitchen we dreamed about took wing. A Certified Kitchen Designer at our local Lowes ended up listening best and having the best ideas, and he basically designed the kitchen and the addition. We spent many hours over many visits with him, over a span of 12 months, and he was fabulous to work with.
I'll skip the details about the first contractor who we spent several months planning with before he decided our house was too far away (what, had it suddenly gotten farther than when we first talked?), or the second contractor we spent several months planning with before the guy who was going to frame the addition for him bailed, which he too bowed out. After a more extensive search and several more contractor interviews, we selected a guy with a higher price, great references, good skills and was great to wrk with -- and finally, 13 months after the flood which spurred us to action, we broke ground in September, 2005. Just over three months later, our dream kitchen was nearly complete.
.....Early on, I printed, cut out, and pasted the following text from a forum posting early last year, which still gives me as much of a grin as it did the first day I saw it on the forum:
"Ask anyone around here, and you'll likely get the same response... You can't over-analyze your kitchen plans. Thinking about every little detail now helps prevent any nasty surprises after the kitchen is installed. Trust me, it's better to make mountains out of mole hills in your head rather than having ugly dysfunctional warts in your kitchen."
-- Alan the Cabinet Maker
Photos
before and during construction:
http://photobucket.com/albums/e185/jacobse/BEFORE%20--%20Old%20Kitchen%20and%20Construction/?start=all Photos of the finished kitchen:
http://photobucket.com/albums/e185/jacobse/AFTER%20--%20The%20Finished%20Kitchen/?start=all
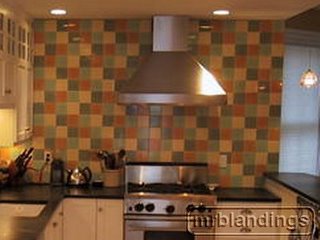
mrblandings' Kitchen
mrblandings' kitchen
Contact:
mrblandings (
My Page)
Posted on Sat, Feb 25, 06
Link to kitchen photos:
http://www.flickr.com/photos/16789696@N05/sets/72157602759775299/Details:
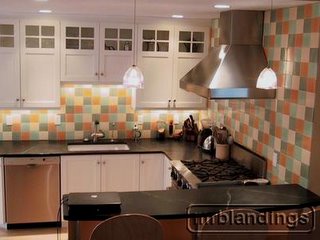
Cabinets: Scherr's. Doors were unfinished poplar, painted on site with BM Satin Impervo (oil based) in White Dove
Counters: Santa Rita Soapstone, installed by M Teixeira
Backsplash tile: Quemere International (called "Newport" at Tile Showcase in Watertown MA). Tile pattern courtesy of fatlester.
Faucet: Grohe Ladylux Plus, stainless finish
Sink: Rohl Allia 6307 fireclay large single bowl
Pendant lights: "Prism" by Tech lighting (low voltage halogen)
Undercab lights: Kichler xenon
Water filter: Aqua-pure DWS 1000
Floors: Ash, finished on site.
Range: BlueStar RNB30
Hood: Vent-a-hood SEPH18-236 (Euro style with Emerald lip, 36", 600CFM):
DW: Bosch SHU43
MW: Sharp R1214
Frig: LG French Door Frig (Full depth, recessed into wall cavity)
Maple work table and butcher block cart: John Boos
Open shelving and peninsula counter support brackets: Rakks
Pot hanging bar: homemade using steel bar from www.metalsdepot.com
(see text below for details)Peninsula seating: Crate & Barrel
Cabinet knobs and drawer pulls: Classic Brass, models 1134SN and 1264SN.
The process:
To really appreciate our kitchen renovation as much as we do, you have to look at the "before" photos. The kitchen was probably last "updated" in the 1940s or 1950s. If you can believe it, it was even worse when we moved in -- we painted the cabinets and replaced the rotting plywood countertop -- all 8 feet of it -- with laminate from home depot. I cooked in that kitchen for six years. There was no ventilation, and the 1970s era Magic Chef range had 9K BTU burners. There was no DW so we bought a portable model that had to be rolled over and connected to the faucet.
The new kitchen floor plan went through many phases. The first phase was the huge "dream kitchen" that required an addition to the house and that we could never afford. The next phase was the "barely acceptable kitchen" where I tried to minimize the structural work and floor plan changes to keep costs as low as possible. I posted the plans on the Kitchen forum, and the general consensus was: why bother spending money on a new kitchen that was just as cramped and poorly laid out as the old one? This feedback was right on target, and gave me the push I needed to find the right floor plan, somewhere between the bare minimum and the unaffordable dream.
I acted as GC on this project. That could make for a long story, but the short version is the same as most people seem to find: I saved significant money, but also paid a lot in my own time and stress, and the project took much longer.
May 16: demolition begins
July 30: plastering begins
Sept 7: soapstone installed
Oct 5: plumbing connected. Working sink, DW and range.
Oct 28: painting complete
November 30: backsplash complete
Dec 8: final electric work (undercounter lights, etc)
The style:
As I am the primary cook, function was my foremost concern, and style second to it - but I still wanted it to look nice. The biggest stylistic question was how to integrate the kitchen into our 1890 era house, especially since the new open floor plan would put the kitchen on display. My DW and I went back and forth on period vs. contemporary, ultimately ending up more on the modern side but with some elements that speak to the home's historical lineage. As it's not a fancy house, we tried to keep things simple and unfussy.
The pot rack:
It is simply a piece of 2" wide by 1/4" thick stainless steel that I bought from www.metalsdepot.com. The metal was $17 for 2 feet plus $10 shipping. I used a dremel to grind down the finish (an angle grinder would have been more effective but I don't have one) and soften the edges, then sanded it down to 600 grit by hand. It's attached to the wall with 1/4" lag screws drilled through the bar, using fender washers to space it out from the wall. The hooks are made by
Enclume and cost about $40 for six, so they were the most expensive part of the project. I'm sure that something cheaper could be used but these hooks are shaped just right for this purpose
pruella's Kitchen
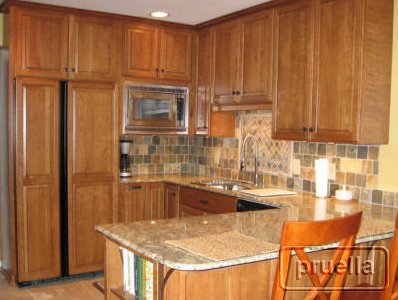
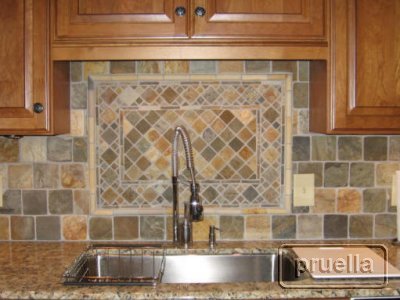
Love my new kitchen!


Contact:
pruella (
My Page)
Posted on Thu, Feb 23, 06
Link to kitchen photo slideshow:
http://photoshow.comcast.net/watch/ni3ka9bsDetails:- Cabinets -Woodharbor/natural cherry with chocolate glaze
- Granite -Gallo Napoleone
- Sink-Moen
- Faucet-Elkay
- Floor- Travertine
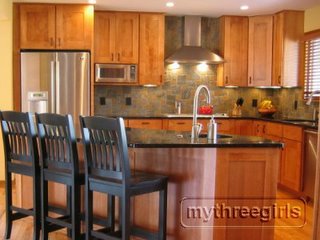
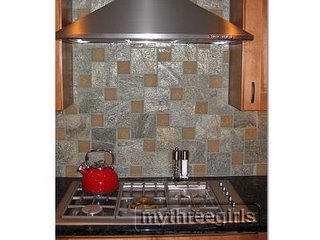
mythreegirls' Kitchen
Pictures of my finished kitchen!
Contact:
mythreegirls (
My Page)
Posted on Tue, Feb 21, 06
Link to kitchen photos:
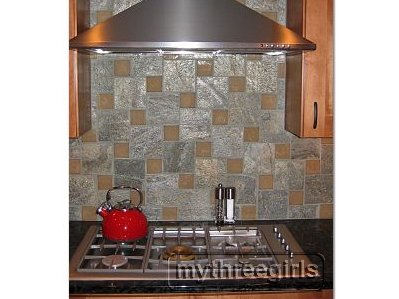
http://share.shutterfly.com/action/welcome?sid=8Jas27Nm2YqwDetails: - Cabinets - Maple with a nutmeg stain from Dura Supreme (the semi-custom line) with Blumotion
- Countertops - Silhouette Black granite
- Hardware - Atlas Hardware
- Flooring - red oak, natural
- Main sink - Kindred with Brizo Venuto pull-down faucet
- Prep sink - Blanco with Blanco Tuscon faucet (plus air switch for the disposal)
- Fridge - LG
- Cooktop and single 30" convection oven - Fisher-Paykel
- Dishwasher - Bosch
- Microwave - GE Spacemaker 2
- Backsplash - slate tiles with glass accent tiles
- Barstools and desk chair - Holstag of Canada
My dad made the wooden bowl holding bananas in the corner!
I have enjoyed this forum so much over the last several months. I was often able to find an answer to many questions that came up during our project with a quick search. It's also been great to get ideas and inspiration from others and fun to see the finished kitchens. So here's mine. Demolition began right around Labor day and we were using the kitchen at Christmas although it still needed a few finishing touches at that point. At the time, it seemed like a long process to live through but our GC and his subs really kept at it and finished up ahead of schedule.
I have also been posting to a blog along the way that includes some "before" and "during" pictures:
http://midwestkitchenremodel.blogspot.com/
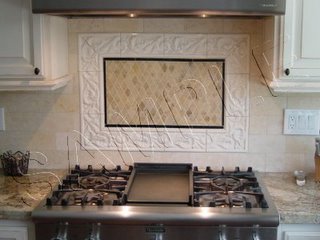
caralann's Kitchen
My Kitchen is 98% Complete!


Contact:
caralann (
My Page)
Posted on Friday, Feb. 17, 2006
Link to kitchen photos:
http://photobucket.com/albums/f109/clslaton/Kitchen/
Details:
- Range Top: Thermador with griddle
- Hood: Vent-a-Hood
- Ovens: Thermador double convection, 27”
- Dishwasher: Bosch, SHX46A
- Refrigerator: Kitchen Aid Counter Depth *
- Sink: Blanco super single Silgranit, anthracite
- Faucet: Kohler Vinnata, brushed nickel
- Cabinets: custom, white with brown glaze
- Knobs/Pulls: Cabinet Hardware Designs, ORB egg knob & bin pull
- Granite on Counters: Juparana Persa
- Granite on Island: Black Galaxy
- Backsplash: Jerusalem Limestone *
- Above Range: Walker Zanger Opus Anticato, Dore Royal Diamante, Tiberon, Antique Crackle Acanthus border, ½” black galaxy granite strips
- Floor: Quick Step Laminate, Perspective -4, Jatoba
- Under Cabinet Lights: Xenon strips from Lowe
* Notes: - The refrigerator was the only item salvaged from the old kitchen!
- Started with 8” x 8” tumbled Jerusalem Limestone tiles, DH cut all four sides off, then cut each in half to get the “subway”style rectangle that I wanted.
- All tile backsplash & tile above range top and floor was DIY
- Still to be done: fish tank cover to match cabinets, molding trim around post and edges of backsplash areas.
- freestanding island: We took out the peninsula & put in a freestanding island. I found an old buffet & added a piece of granite on top. I supported the overhang by adding another leg on the backside. It adds some additional storage, but mainly a work surface. I originally wanted to put the island on wheels, but opted for gliders - it stays put until I want to move it out of the way.
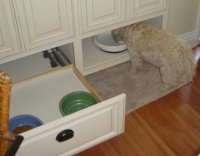
- dog bowls: I lowered the sides of a bottom drawer so that the dogs could eat from the sides. For the water, I removed the cabinet door & put the water bowl inside so they can drink from it all day.
lmychajluk's Kitchen
My finished kitchen!

Contact:
lmychajluk (
My Page)
Posted on Fri, Feb 10, 06
Link to kitchen photos:
http://lmychajluk.multiply.com/photos/album/6Details:
- The cabs are Brookwood (Starmark) Cherry wood in a Shaker style w/ the low-sheen Brittany finish. They include a double-trash pullout and a 4 bin recycling center, corner pantry, narrow pull-out pantry next to the fridge, another pull-out in the bar along with pull-out shelves behind the door next to the bar fridge, and super-suzans in the right wall corner.
- The handles are Top Knobs, except for 'Art', the Soku Manhandle.
- The fridge is a GE Profile, as is the Advantium220 OTR Mic.
- The oven is a GE Trivection, and dishwasher is also GE Monogram.
- Cooktop is Gaggenau modular 200-series (double-burner, electric grill, & wok burner).
- Bar fridge is Marvel.
- Countertops are black Richlite w/ integrated drain board.
- Sink is Blanco Precision 1 - 3/4, with Elkay Moda faucet and Grohe soap dispenser.
- Brew Express built-in coffee maker.
- Lights are Juno Avio series, with Kitchler Xenon undercabinets, and a el-cheapo incandecent strip for inside the above-bar cab all connected to a Lutron Graffik Eye RA 6-zone control unit (above the coffee maker).
- Floor is Happy Tile Overland Green Moss, and the SS accents are from Schluter, as are the accents in the backsplash.
- Backsplash is Hakatai 3/4" glass tiles "Hail Blend" with a custom mural behind the cooktop.
- Can't see it, but there are also Task Lighting power strips tucked up under the cabs for outlets.
It was a DIY job with my brother and uncle
Had I known, things I would've done different:
- slightly darker grout in the backsplash (I went lighter at the last minute).
- Something quieter than the Marvel bar fridge.
That's it, other than that, I'm very happy with how it came out!


0 comments:
Post a Comment