
mrblandings' Kitchen
mrblandings' kitchen

Contact: mrblandings (My Page)
Posted on Sat, Feb 25, 06
Link to kitchen photos: http://www.flickr.com/photos/16789696@N05/sets/72157602759775299/
Details:
Cabinets: Scherr's. Doors were unfinished poplar, painted on site with BM Satin Impervo (oil based) in White Dove
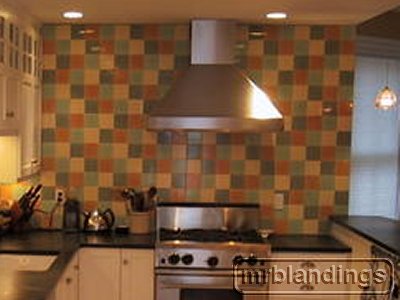
Counters: Santa Rita Soapstone, installed by M Teixeira
Backsplash tile: Quemere International (called "Newport" at Tile Showcase in Watertown MA). Tile pattern courtesy of fatlester.
Faucet: Grohe Ladylux Plus, stainless finish
Sink: Rohl Allia 6307 fireclay large single bowl
Pendant lights: "Prism" by Tech lighting (low voltage halogen)
Undercab lights: Kichler xenon
Water filter: Aqua-pure DWS 1000
Floors: Ash, finished on site.
Range: BlueStar RNB30
Hood: Vent-a-hood SEPH18-236 (Euro style with Emerald lip, 36", 600CFM):
DW: Bosch SHU43
MW: Sharp R1214
Frig: LG French Door Frig (Full depth, recessed into wall cavity)
Maple work table and butcher block cart: John Boos
Open shelving and peninsula counter support brackets: Rakks
Pot hanging bar: homemade using steel bar from www.metalsdepot.com (see text below for details)
Peninsula seating: Crate & Barrel
Cabinet knobs and drawer pulls: Classic Brass, models 1134SN and 1264SN.
The process:
To really appreciate our kitchen renovation as much as we do, you have to look at the "before" photos. The kitchen was probably last "updated" in the 1940s or 1950s. If you can believe it, it was even worse when we moved in -- we painted the cabinets and replaced the rotting plywood countertop -- all 8 feet of it -- with laminate from home depot. I cooked in that kitchen for six years. There was no ventilation, and the 1970s era Magic Chef range had 9K BTU burners. There was no DW so we bought a portable model that had to be rolled over and connected to the faucet.
The new kitchen floor plan went through many phases. The first phase was the huge "dream kitchen" that required an addition to the house and that we could never afford. The next phase was the "barely acceptable kitchen" where I tried to minimize the structural work and floor plan changes to keep costs as low as possible. I posted the plans on the Kitchen forum, and the general consensus was: why bother spending money on a new kitchen that was just as cramped and poorly laid out as the old one? This feedback was right on target, and gave me the push I needed to find the right floor plan, somewhere between the bare minimum and the unaffordable dream.
I acted as GC on this project. That could make for a long story, but the short version is the same as most people seem to find: I saved significant money, but also paid a lot in my own time and stress, and the project took much longer.
May 16: demolition begins
July 30: plastering begins
Sept 7: soapstone installed
Oct 5: plumbing connected. Working sink, DW and range.
Oct 28: painting complete
November 30: backsplash complete
Dec 8: final electric work (undercounter lights, etc)
The style:
As I am the primary cook, function was my foremost concern, and style second to it - but I still wanted it to look nice. The biggest stylistic question was how to integrate the kitchen into our 1890 era house, especially since the new open floor plan would put the kitchen on display. My DW and I went back and forth on period vs. contemporary, ultimately ending up more on the modern side but with some elements that speak to the home's historical lineage. As it's not a fancy house, we tried to keep things simple and unfussy.
It is simply a piece of 2" wide by 1/4" thick stainless steel that I bought from www.metalsdepot.com. The metal was $17 for 2 feet plus $10 shipping. I used a dremel to grind down the finish (an angle grinder would have been more effective but I don't have one) and soften the edges, then sanded it down to 600 grit by hand. It's attached to the wall with 1/4" lag screws drilled through the bar, using fender washers to space it out from the wall. The hooks are made by Enclume and cost about $40 for six, so they were the most expensive part of the project. I'm sure that something cheaper could be used but these hooks are shaped just right for this purpose


1 comments:
The photos have been moved. The new link is: http://www.flickr.com/photos/16789696@N05/sets/72157602759775299/
Post a Comment